Saturday, November 28, 2009

Paper Ornaments

I wanted a craft project to do with the girls on Wednesday while they were out of school And, I really didn't want to make another pony bead jewelry piece, or construction paper, crayon melting kid craft. I wanted a real grown up craft that we would acutally use and all enjoy. So, we came up with these paper ornaments to hang from the chandelier.

Supplies:
Scrapbook or wrapping paper
Scissors or Rotary Cutter (just faster)
Stapler
Ruler

I used my rotary cutter to cut the scrapbook paper into strips 1" wide. Then, I marked lines on the strips and let the girls use their scissors to cut them to the following lengths. 6", 7", 9", and 11".

Then, the girls gathered 2 strips each of the longest pieces and 1 strip 6" long. Stack them together with the shortest one in the middle, so that your stack is like this 11, 9, 7, 6, 7, 9, 11. Line up all the strips at one end and staple it together.

Then, gather them up so that the opposite ends all line up. The paper will just start to stick out on its own as you go. Abby needed a little bit of help to get the concept of how it was supposed to work, but once I showed her, she was able to do it on her own.

Just staple the other side once you have all the ends matched up and you are done. We tied strings through them so we could hang them from the chandelier in the dining room. I had been wanting to decorate it for Christmas but didn't want to use just plain garland. I thought these turned out really cute.

You can vary the lengths of the paper strips to make pretty much any size ornament you want. We used the scraps to make the smaller on in the center.

Saturday, November 21, 2009

Hairbow Holder


This is for my neice Phoebe for Christmas. She wears lots of little clippy hairbows in all colors. Hopefully this will help her mom keep track of them all. And it was super cheap too! $5.39 for 2 since I already had the fabric and ribbon! One for Phoebe and one for my girls.


Here is what you will need:
Canvas - 11" x 14" from Hobby Lobby (2 pk $8.99 and I used a 40% off coupon)
Fabric - from my stash
Grossgrain Ribbon - from my stash
Staplegun

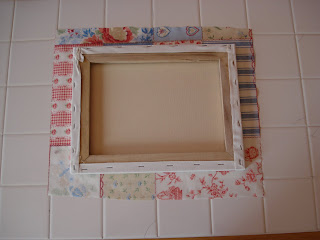
First, lay the canvas on your fabric and trim it so that you have plenty to wrap over the edges.
Time for the staplegun! I started with the long sides, then did the corners and finally stapled the middle of the short sides. Just make sure you stretch it tight all the way around.
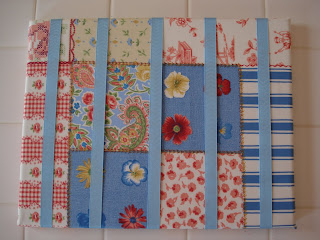
Here is the front once it is all stapled.
Then, just cut your ribbon to the length needed, staple it to the back of the canvas. I am going to add a picture frame hook to the back and it will be completely done.


Thursday, November 19, 2009

Fabric Headband


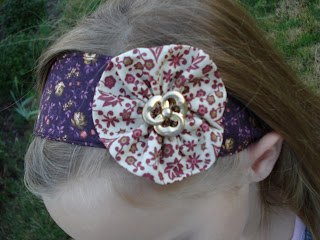
Well, I made the adorable flower that you see on the headband to be pinned on Aly's brown shirt that goes with the Twirly Stripwork Skirt. But, she asked if I could make it into a hairbow instead b/c she didn't want it on her shirt. I had found a tutorial a while back for fabric headbands from The Long Thread's Make it Monday that I had been wanting to try. Here's the template.

The flower was very easy to make. All I did was fold a 3" x 10" piece of fabric in half lengthwise and hand stitch down the long side, gather it up and stitched the ends together.
I didn't have any black elastic, so I looped 2 ponytail rubberbands together instead. It worked perfectly.
One last picture of a pose Aly chose herself. All these goofy ones will come in handy for blackmail one day.

Saturday, November 14, 2009

Knitting

Mama, don't read this if you get it as an email. Close IMMEDIATELY! I changed my settings so hopefully you won't get it but just in case... GO AWAY!

Ok, hopefully she is gone now. I FINALLY finished the scarf I have been working on for what seems like forever. I honestly can't remember when or who I actually started making this for, but come Christmas, it will be Mama's.

I had Abby model it for me since Donna said I needed more pictures of her on here.

Then Cookie begged to be on my blog too since she felt left out, so I said OK.

I just kept this in the truck and would work on it whenever I had to sit and wait somewhere. Mostly at the school waiting to pick the girls up in the afternoons. Sometimes when we would go somewhere as a family and Jay would drive. I had to find something to keep me occupied so his driving wouldn't make me so nervous. He is a police officer, so I know he knows how to drive and has way more experience and training in how to drive than most normal people, but he is constantly in patrol car driving mode so it is best for me to just not look when he drives.

Wednesday, November 11, 2009

Twirly Stripwork Skirt


These are the measurements for making a size 6 skirt. You can easily adjust it by making the individual pieces slightly larger or smaller as needed.

I don't really know total yardage of fabric you will need b/c mine was all pulled from scraps except the purple. You just need 16 total pieces for the body of the skirt, you can use as many or as few different fabrics as you want.

For this version, you will need 4 coordinating fabrics cut to the following dimensions:

4 pieces of each of the 4 fabrics measuring 6" x 10"
1 piece fabric of choice for the bottom measuring 3" x 90"
1 piece fabric of choice for the drop waist measuring 7" x 30"

Everything was sewn using 1/4" seam allowances except the elastic casing for the waist.

Sew the 6" x 10" pieces together along the 10" sides to form the skirt body.


Piece your bottom hem pieces together to get a strip measuring 3" by 90". Then fold it in half top to bottom and press.

Sew this piece along the bottom of your skirt body and trim any extra off of the end.

To make gathering more easy, I simply sew a wide long zig zag stitch over a piece of cotton yarn. I had 1/2 skein of a Peaches and Cream type yarn left over from another project and I just use it over an over again for all of my gathering, but any thinner yarn will work just fine. Then, just start gathering the skirt piece on the string until it measures approximately 30", the same length as your drop waist piece. I don't actually gather it on the machine as I go, just a pic to show you how it is done.

Pin the gathered skirt to the bottom of the drop waist placing right sides together.

I don't worry about taking out the piece of yarn, I just sew right through it. I usually stitch the skirt to the drop waist piece twice. First with a straight stitch, then with a zig zag in the seam allowance to help cut down on some of the raveling later. I have a singer tiny serger, but it really isn't worth getting out to do this in my opinion.
Umm, this is where the pictures of the steps stop. Why you might ask? Well, because I got in a hurry. I had to finish the skirt in time to make a mad dash to Wal-Mart to find a matching shirt before I had to pick the girls up from school. I knew Aly would want to wear it to tomorrow and going to Wal-Mart with 2 girls is not something I usually find fun.

Ok, all that is really left to do is sew up the side seam and make the casing for your elastic. I am sure if you have made it this far, you can figure out how to do those 2 things without pictures. For the elastic measurement, I use a piece of elastic 1" shorter than the actual waist measurement. Aly's waist is 21" so I used a 20" piece of elastic and overlapped it by about 3/4" when I sewed the 2 ends together. I like to use either 3/4" or 1" elastic for waistbands, but it is really all personal prefrence.
Put it on your favorite 6 year old, send them to the yard, and snap some pics of her having fun twirling, dancing, and doing her best self chosen model poses. Aly requested that "I be able to wear this with jeans instead of leggings, but jeans without red on them, just plain ones please". Fine with me because I think wearing skirts with jeans shows her personality, which is cute, innocent, and funky all at the same time. Plus, they are warmer than leggings.

Oatmeal Raisin Apple Muffins


I did mostlly mini muffins so my regular size ones are kind of small b/c I barely had enough to fill the 6 ct. regular size tin. That is why this one is so short.

This is my all time favorite Muffin Recipe. I started with a recipe I found somewhere on the internet and altered it until it was just the way I like it.

Preheat the oven to 375 degrees and grease 12 muffin cups

1 cup all purpose flour
1/4 cup whole wheat flour
1 cup old-fashioned rolled oats
1/2 cup sugar
2 tsp. baking powder
1/2 tsp baking soda
1/2 tsp salt
1 tsp cinnamon
1 cup applesauce
1 egg
1/3 cup canola oil
1/3 cup milk
1/2 cup chopped nuts or sunflower seeds
1/2 cup raisins

Combine the first 7 dry ingredients in a medium bowl. Mix the applesauce, egg, oil and milk in another. Make a well in the middle of the dry ingredients and stir in the wet ones, mixing just until combined. Fold in the nuts and raisins, divide among the muffin cups. Bake at 375 for 18 to 20 minutes until the muffins are golden brown and smell heavenly.

My Favorite Picture


This is one of my all time favorite pictures of Aly. I downloaded the free 30 day trial of photoshop just to play around with some old pics and see if I would ever be willing to pay money to have it. Here I removed the color everywhere except her eyes. That is her natural eye colore people! Click on the picture to make it bigger so you can see them good. Aren't they gorgeous. She takes after her Paw Paw.

Tuesday, November 3, 2009

Marshmallow Fondant

Just found a really great you tube video on how to make Marshmallow Fondant.  I will have to try making some of this in preparation for the next round of birthday cakes for the girls.  Or, maybe we can decorate some cupcakes for Thanksgiving or Christmas.

6 Year Old Coolness

Oh my, where has my little baby girl gone.  She officially moved permanently into a backless booster this weekend.  Only because I didn't think the booster I was using with Abby was safe, so she moved into Aly's old one and Aly got the backless one I already had. 

She thinks she is so cool in her sunglasses and new boots.  I have to admit, those are some cool pink plaid boots!  Found on the clearance rack at Target.

Sent from my Verizon Wireless BlackBerry

Mod Podge Pumpkins

The girls wanted to decorate their pumpkins and I just wasn't up for carving with them. We ended up with 3 pumpkins this year so I let them each decorate their own small pumpkins. I carved an owl on the big pumpkin accidentally deleted the picture. Ooops.


The cat is Abby's and the witch is Aly's.


The supplies are really simple. All you need is Mod Podge, cheapo paintbrushes, a pattern and scrapbook paper, or picture of your choice, and pumpkins.


I used bits of leftover scrapbook paper to cut out the pieces of the witch.


Abby just wanted a simple black cat so hers was easy.


Spread Mod Podge on the back of the picture or paper you are using. Then stick it to the pumpkin and smooth out any wrinkles. Once you have all your pieces of paper glued to the pumpkin, add a layer of Mod Podge over your whole pumpkin. Since we didn't make ours until Halloween and they didn't need to last long, we only put on one coat, but to make it last longer, I would think 3-4 coats would be best.


It would be cute to do some leaves, turkeys, or pilgrims for Thanksgiving too.