Ok, since I keep having requests for this recipe, I thought I would put it on my blog so you don't have to call, e-mail, or text me and then wait for me to find the recipe and then actually remember to send it to you. Sorry, I don't have a picture to post with it right now. And for anyone who hasn't eaten this whenI have made it, I only call it salad to make it sound healthy. It is soooo yummy!
Grape Salad
Filling
2 lbs grapes (1 lb red & 1 lb green)
2- 8 oz pkgs cream cheese or neufchatel cheese
1 cup sour cream
1/2 to 1 cup sugar
1 tsp vanilla
Mix cream cheese, sour cream, sugar, and vanilla with mixer then stir in grapes with a spoon. Put in refrigerator.
Topping
1 cup pecans (can use more)
3/4 of a stick butter (use more if needed depending on how many pecans you use)
1/2 cup brown sugar
Melt butter, add brown sugar and nuts. Bake at 350 F for 15 - 20 minutes (do not overbake or it will be so hard it will break your teeth once it has cooled). Cool mixture a few minutes then sprinkle over grape mixture. Can be served right away, but I like to refrigerate mine until the topping gets hard first.
And just to be clear, I am not the original creator of this recipe. It was given to me by Glenda Easley, a friend of my hubby's parents. By far one of my favorite recipes I have ever recieved.
Friday, October 29, 2010
Friday, October 22, 2010
2nd Grade Catapult Invention
As we were walking in the house after school yesterday at 3:00, Aly says "I have to take my catapult to school tomorrow" My response was Uummm, what are you talking about? What catapult? We don't have a catapult." Then she tells me she is supposed to make one. Apparently she got the note about it from her teacher on Monday or Tuesday and just forgot to tell us about it since it wasn't put in her regular folder that we check every day.
Normally, this wouldn't have been an issue, but yesterday, it was because Abby's music program started at 6:00 which I had also forgotten about until Abby mentioned it on the way home from school. That meant I had 3 hours to fix after school snacks, do homework, get everybody ready, figure out how to make a catapult, and actually make the darn thing.
Oh, and Abby said her teachers told her she HAD to take a bath or else they wouldn't let her sing, and that she had to dress pretty and have her hair fixed. After all, she was going to be singing on stage and standing on risers. Huge deal when you are 5 years old apparently. I think in her mind, if she tells us her teachers said she had to do something then we are much more likely to actually let her do it.
So HERE is the catapult we would have liked to make, but since I had NO wood to work with at our house unless you count some half rotten tomato stakes and landscape timbers.

They had been learning about a man that made lots of inventions and they were supposed to build their own catapult as an invention. While I would have loved to build the nice fancy catapult we found online, ours was definitely more inventive, which I have to keep telling myself was the whole point of this assignment. There were really no rules, the note just said encourage your child to build a catapult and help out as you see fit. They were having a marshmallow shooting contest with them at school today.
And this is the catapult Aly and I actually built yesterday.

After looking for a few minutes online and not finding anything we had all the supplies for, we set out to invent our own catapult. I had the idea to use a popsicle stick and the chip clip. After playing with these 2 things for a minute I told Aly I didn't think the popsicle stick was strong enough and we needed to find something stronger, she suggested we try using 5 or 6 popsicle sticks. Way to go my inventive little girl. The problem was, how to stick them together. I was almost out of tape, and had NO hot glue sticks left. There wasn't enough time to let wood or school glue dry. Bring on the rubber bands! First we rubber banded all 5 popsicle sticks together, and then we used more rubber bands to attach them to the chip clip. Aly said we should use my coke bottle lid to hold the marshmallow, but when we tried it, it was too small. They were going to use regular size marshmallows at school. We went with a Gatorade bottle lid instead and it was the perfect size.
So, we had our catapult, but it was a little hard for Aly to use. She said we needed to glue it to a board or something so she would have something to hold onto to make it easier to shoot the marshmallows. We screwed 2 pieces of rotten tomato stakes together and then used more rubber bands to hold our catapult to the wood block.
Success! Our first marshmallow flew from our dinner table, over the refrigerator and landed somewhere in the kitchen where we never found it. They all had fun shooting their marshmallows at school today. And while Aly's didn't shoot the farthest, she did come in 3rd place and she was very excited that hers hit the ceiling in her classroom.
Aly posing with her catapult.

Being such a great big sister helping Abby hold the catapult so she could shoot it better.
Tuesday, October 19, 2010
Wood Halloween Pendants
Wow, 2 posts in one week. School has been keeping me very busy so there has been very little crafting in my life the past couple of months, much less blogging about what I make. Here is a super quick and easy craft just in time for Halloween. I will be making some more durable Christmas ones to sell at a craft show on the weekend after Thanksgiving in McConnells, SC.
Supplies (all from Hobby Lobby): Mod Podge, Scrapbook Paper, 1" wooden disks, and larger jump rings.


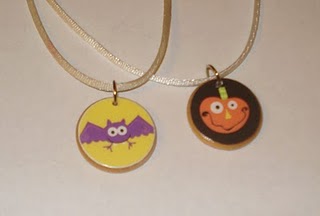
Total cost not including Mod Podge or cording $4.42 and you will have enough to make 12 with lots of jump rings left over.
Sunday, October 17, 2010
On the Machine
A German Dirndl for my friend Angel. Finally something fun and slightly challenging for me to make. I am having so much fun with this project for some reason. Hopefully it turns out well and Angel will let me post some pictures of her wearing it. I am using the BurdaStyle 6038.

I have mixed feelings about the pattern. The pieces are going together great. That is after I finally figured out how to put it together pretty much by myself. The instructions that came with the pattern are probably the worst instructions I have ever seen. EVER!

Thankfully, Grosgrain has made her version/ interpritation of the dress and posted some wonderful instructions. She added piping to the front seams and also put a zipper in the back, but you can still pretty much follow her directions and just leave out the zipper and piping. Changing her instructions is definately easier than trying to follow the ones Burda gives you with the pattern.
Subscribe to:
Posts (Atom)