Saturday, January 15, 2011

Laundry Sign

Last weekend, the local news stations started predicting a pretty substantial snowstorm with possible power outages.  I planned ahead with some craft projects to keep me busy even if we did lose power.   In other words, something that didn't require a sewing machine.  So, I decided to finally make a sign to hang over my Laundry Room door. 
My sign measures approximately 22.5" x 5.5".  Here is a PDF of it in case anyone wants to make their own.  The word Laundry measures 15.5" x 3.5" and Wash, Dry, Fold measures 15" x 2.5".  I also included the word Room in the file in case anyone wanted to add that to their sign.  ENJOY!
                                      
I was lucky enough to find a nice rough piece of wood in the scrap bin at Home Depot last week for a grand total of 51 cents.  It was about 4 ft long so I had them cut it for me.  I was happy to find out that they will even cut scrap bin pieces for free, not just full price ones.
I used a hammer and wrench to beat the wood up for a nice distressed look.  Actually, I let the girls take out some frustration on it.  They loved it!
Then, I painted it with a coat of light blue since I was running short on white paint and wasn't sure how much the wood would (giggle) soak up.
Abby was REALLY wanting to paint, and since I was going for a distressed look anyway, I let her paint the coat of white paint on for me.  While painting, she asked me, "Mommy, is painting fun?"  Almost like she wasn't sure if she was allowed to have fun while I was letting her work on one of my "real" projects.
I like how some of the blue is showing through from the first coat of paint.  I think it adds a nice touch to the distressed look I was going for.
I printed out the words in a couple of different sizes of a font that I liked.  I originally planned for it to say Laundry Room, but liked this arrangement better once I got it all laid out.
I colored on the back of the printed words with a pencil, then taped it to my board, and traced over the letters on the right side to transfer the image.  Wish I had thought to pick up some transfer paper to make the job a lot faster and easier.
All that was left to do was to paint the letters in.  While this was not quite as elaborate as some of the things I have painted before, I really like it and think it looks great against the red wall of my kitchen.

Sunday, January 2, 2011

How Did I Do Meeting Last Years Goals?

1) Organize my craft and sewing supplies.
This one still needs a ton of work.  I have moved and re-organized lots of things, but it is a never ending process.
2) Organize my work stuff- no more cardboard boxes everywhere.
Doing better on this one.
3) Finish at least 1 quilt.
Yup, finished 2 actually. 1 for myself and 1 for my Mama.
4) Spend more time actually playing with the girls and let them sew more too.
We definately did more sewing during the spring and summer.
5) Get more exercise. (the new Wii the girls got for Christmas should help)
Did great in the spring then I had a much harder semester of school and just didn't have time to go to the gym like I did before.  Studying was more important.
6) Manage my time better. (an absolute must since I'm going back to school)
Definately accomplished this goal!
7) Cook from scratch more and do a better job of menu planning so we eat healthier.
Not so much, need to keep working on this one.
8) Last but not least, find a church to go to. Especially for the girls to be in Sunday School. We have just been lazy about going and finding a church we like since we moved here 2 1/2 years ago. (Angel, we would love to visit yours sometime.)
The girls and I have been going to Pendleton United Methodist Church whenever the girls are in town, not visiting their Grandparents.  We really like it there.  It is small and it feels a lot like the church I grew up in, Olivet Presbyterian Church.

Saturday, January 1, 2011

Mama's Whirlygig Quilt

 
First I have to say it was VERY hard for me to not let Mama know I was working on this quilt.  I usually keep her updated every step along the way from the inspirational design, choosing the fabric, how many blocks I have finished, making the sandwich and doing the quilting, then finally making and sewing on the binding.  I only almost told her I was working on a new quilt once and thankfully she wasn't paying too close of attention and didn't comprehend what I said.
I even had this quilt finished before Thanksgiving and kept myself from giving it to her early.  Needless to say, she was VERY suprised when she opened it.  It is a lap size quilt measuring approximately 51" x 59".  I forgot to measure it once it was all finished, but that was the last measurement I took when I had the top completely finished. 

The print fabrics are from a couple of fat quarter bundles of Donna Dewberry fabric I picked up at a craft show a few years ago.  The cream is leftover fabric from when I made quilts for my 2 girls.
I think I found my original inspiration from Quilting on Turtle Hill, but there are lots of free tutorials out ther if you just google whirlygig quilt.

Monday, December 27, 2010

Slushy Syrup

Abby was very happy to get her very own Slushy Machine for Christmas.  She requested a blizzard maker, but since we already have 2 different types of ice cream churns, I'm glad her grandparents decided to go with this instead.  You can get one at Toys R Us. We tried it out on Christmas night and it did a great job of shaving the ice.  Much better than doing it in the blender like we have tried before. 


The syrup mix on the other hand was disgusting.  What a letdown for a kid that just made her first slushy.  We tried the orange flavor and it tasted slightly orangey and very chemically.  So, today, I made my own syrup using the recipe below, and we all had wonderful grape slushys for an afternoon snack.  Abby was a very happy little girl.

Slushy Syrup
1 cup water
1 packet unsweetened Kool Aid mix
1 3/4 cups sugar

Put everything in a small pot on the stovetop and heat on medium until the sugar is completely dissolved.  Allow it to cool.  We re-used a water bottle with a sports bottle top to store ours in and make it super easy to pour over our shaved ice.

Friday, October 29, 2010

Grape Salad

Ok, since I keep having requests for this recipe, I thought I would put it on my blog so you don't have to call, e-mail, or text me and then wait for me to find the recipe and then actually remember to send it to you.  Sorry, I don't have a picture to post with it right now.  And for anyone who hasn't eaten this whenI have made it, I only call it salad to make it sound healthy.  It is soooo yummy!

Grape Salad

Filling
2 lbs grapes (1 lb red & 1 lb green)
2- 8 oz pkgs cream cheese or neufchatel cheese

1 cup sour cream
1/2 to 1 cup sugar
1 tsp vanilla

Mix cream cheese, sour cream, sugar, and vanilla with mixer then stir in grapes with a spoon. Put in refrigerator.

Topping
1 cup pecans (can use more)
3/4 of a stick butter (use more if needed depending on how many pecans you use)
1/2 cup brown sugar

Melt butter, add brown sugar and nuts. Bake at 350 F for 15 - 20 minutes (do not overbake or it will be so hard it will break your teeth once it has cooled). Cool mixture a few minutes then sprinkle over grape mixture. Can be served right away, but I like to refrigerate mine until the topping gets hard first.

And just to be clear, I am not the original creator of this recipe.  It was given to me by Glenda Easley, a friend of my hubby's parents.  By far one of my favorite recipes I have ever recieved.

Friday, October 22, 2010

2nd Grade Catapult Invention


As we were walking in the house after school yesterday at 3:00, Aly says "I have to take my catapult to school tomorrow"  My response was Uummm, what are you talking about?  What catapult?  We don't have a catapult."  Then she tells me she is supposed to make one.  Apparently she got the note about it from her teacher on Monday or Tuesday and just forgot to tell us about it since it wasn't put in her regular folder that we check every day. 

Normally, this wouldn't have been an issue, but yesterday, it was because Abby's music program started at 6:00 which I had also forgotten about until Abby mentioned it on the way home from school.  That meant I had 3 hours to fix after school snacks, do homework, get everybody ready, figure out how to make a catapult, and actually make the darn thing. 

Oh, and Abby said her teachers told her she HAD to take a bath or else they wouldn't let her sing, and that she had to dress pretty and have her hair fixed.  After all, she was going to be singing on stage and standing on risers.  Huge deal when you are 5 years old apparently.  I think in her mind, if she tells us her teachers said she had to do something then we are much more likely to actually let her do it. 

So HERE is the catapult we would have liked to make, but since I had NO wood to work with at our house unless you count some half rotten tomato stakes and landscape timbers.

They had been learning about a man that made lots of inventions and they were supposed to build their own catapult as an invention.  While I would have loved to build the nice fancy catapult we found online, ours was definitely more inventive, which I have to keep telling myself was the whole point of this assignment.  There were really no rules, the note just said encourage your child to build a catapult and help out as you see fit.  They were having a marshmallow shooting contest with them at school today.
 
And this is the catapult Aly and I actually built yesterday. 
After looking for a few minutes online and not finding anything we had all the supplies for, we set out to invent our own catapult.  I had the idea to use a popsicle stick and the chip clip.  After playing with these 2 things for a minute I told Aly I didn't think the popsicle stick was strong enough and we needed to find something stronger, she suggested we try using 5 or 6 popsicle sticks.  Way to go my inventive little girl.  The problem was, how to stick them together.  I was almost out of tape, and had NO hot glue sticks left.  There wasn't enough time to let wood or school glue dry.  Bring on the rubber bands!  First we rubber banded all 5 popsicle sticks together, and then we used more rubber bands to attach them to the chip clip.  Aly said we should use my coke bottle lid to hold the marshmallow, but when we tried it, it was too small.  They were going to use regular size marshmallows at school.  We went with a Gatorade bottle lid instead and it was the perfect size.

So, we had our catapult, but it was a little hard for Aly to use.  She said we needed to glue it to a board or something so she would have something to hold onto to make it easier to shoot the marshmallows.  We screwed 2 pieces of rotten tomato stakes together and then used more rubber bands to hold our catapult to the wood block. 

Success!  Our first marshmallow flew from our dinner table, over the refrigerator and landed somewhere in the kitchen where we never found it.  They all had fun shooting their marshmallows at school today.  And while Aly's didn't shoot the farthest, she did come in 3rd place and she was very excited that hers hit the ceiling in her classroom.
Aly posing with her catapult.

 Being such a great big sister helping Abby hold the catapult so she could shoot it better.

Tuesday, October 19, 2010

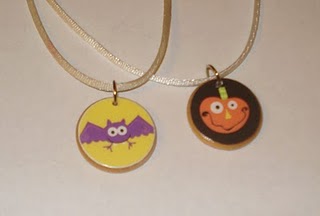
Wood Halloween Pendants

Wow, 2 posts in one week.  School has been keeping me very busy so there has been very little crafting in my life the past couple of months, much less blogging about what I make.  Here is a super quick and easy craft just in time for Halloween.  I will be making some more durable Christmas ones to sell at a craft show on the weekend after Thanksgiving in McConnells, SC. 

Supplies (all from Hobby Lobby): Mod Podge, Scrapbook Paper, 1" wooden disks, and larger jump rings. 

Cut out round pieces about the same size as your wooden disks.  I glued them down with Mod Podge.  Then I sanded down any edges that might be hanging off.  That was easier than getting the circles cut perfectly.  I put 2 coats of Mod Podge on top of each one.  Use Triple Thick on top if you have the 3 or so days to wait for them to dry.  It will be more durable than Mod Podge, but since it is already so close to Halloween, I went the fast route for these.

Drill a small hole close to the top, slide your jump ring through, and pinch closed.  My jump rings were big enough and bent easily enough I didn't even have to go find pliers!

Slip them onto a piece of cording and pass them out to your little girls best friends who just so happen to live in the neighborhood.  Pumpkin for Abby, Bat for Aly, Ghost for Taylor, and Frankenstein for Evelyn.

It took me just 3 hours which included driving to the store where I saw the inspirational halloween scrapbook paper, tracked down wooden disks and jump rings, picked the girls up from school, made an afternoon snack, did homework with both girls, cooked supper, found the drill, charged the dead battery for the drill, and finally delivered the finished necklaces.

Total cost not including Mod Podge or cording $4.42 and you will have enough to make 12 with lots of jump rings left over.